
The perfect do it yourself gift idea for Mum this Mother's Day! This Picnic Caddy was sewn together using a Singer Talent 3323. It is fun and easy to put together. It can be used as a way to transport food in style to any event. When it is opened flat, it can serve as a table runner and when it is closed it keeps the meal covered.
Shopping List:
- One 14" x 25" (38.1cm x 63.5cm) Inner Fabric
- One 12" x 42" (30.48 x 106.68cm) Inner Fabric
- One 14" x 25" (38.1cm x 63.5cm) Batting
- One 12" x 42" (30.48cm x 106.68cm) Batting
- One 14" x 25" (38.1cm x 63.5cm) Outer Fabric
- One 12" x 42" (30.48cm x 106.68cm) Outer Fabric
- All purpose thread
- Two 3/8 - 1/2" dowels, each cut 13" (33.02cm) long
- One yard (91.44cm) of 1 1/2" (2.54cm) for the bow
- Fabric spray adhesive
- Ruler
- Fabric marking tool
- Hand sewing needle
Sewing Directions:
- Thread the top of the machine and the bobbin with all purpose thread. Set the machine for straight stitch in center needle position.
- Following the manufacturer's instructions, spray one side of each batting piece with the fabric spray adhesive.
- Place the inner fabric pieces onto the corresponding size batting sections.
- Using a ruler and fabric marking tool, draw parallel lines diagonally about 2" apart, on the right side of both inner fabric pieces.

- Stitch on the drawn lines, sewing through the inner fabric and batting.
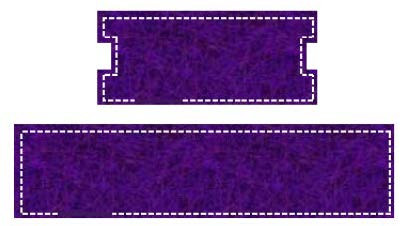
- On the shorter sections only (for both the inner and outer fabrics), cut out a section on each of the shorter ends. Measure 5" (12.7cm) over from each side, and cut out the center 4" (10.16cm), then go 3" (7.62cm) deep into the fabric sections. The cut out will be used to create the "handles" (Note: drawings are not to scale)

- Pin the right sides of the inner and outer short sections together. Stitch, leaving a 4" (10.16cm) opening along one side for turning the right side out.
- Clip the corners and the seam allowances, then turn both pieces the right side out and press.

- Slip stitch the opening closed with a hand sewing needle
- Lay the two sections so that the shorter lies below the longer, intersecting them in a perpendicular arrangement. Stitch together where the two intersect.

- Turn the ends of the handle areas under and stitch in place to form small "tubes". Slide the dowels into place. (Note: If desired, the dowels can be painted to coordinate with the fabric colour. Allow then to dry thoroughly before placing into the handle areas.)
- Place your chosen dish into the caddy, then tie with a bow to close.