
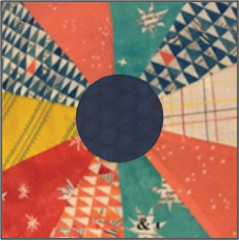
Personalise your sewing space by making a pillow cover for a 16” round pillow. Key skills involve adding decorative stitches and putting in a zipper. The pillow top is made with 10 fabric wedges and a center applique. Pattern templates for the wedges, center applique and pillow back can be found in the last pages of these instructions.
Shopping List:
- 10 fabric scraps in assorted colours for the wedges
- ½ yard fabric for both the pillow back & applique for pillow front circle
- 14” zipper to coordinate with pillow back fabric
- INSPIRA™ Tear-A-Way™ stabilizer (to support decorative stitching)
- Threads in assorted colours (for decorative stitching)
- All-purpose thread for construction
- 16” (41cm) circle pillow form
- Rotary cutter, mat and ruler
- Removable fabric marking tool
- Pinking shears (optional)
- Pattern templates for Applique Circle, Wedge, and Back
Sewing Directions
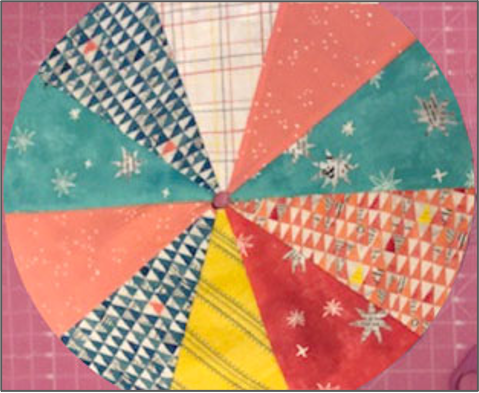
- The front of this 16” (41cm) round pillow has ten total wedges cut from a variety of fabrics. The pattern templates for the wedges, as well as the center circle applique and the pillow back, can be found on the last pages of these instructions. Note: the seam allowances have been included for all templates.
- For the pillow shown in the photo, two of the ten wedges were embellished with decorative machine stitching.
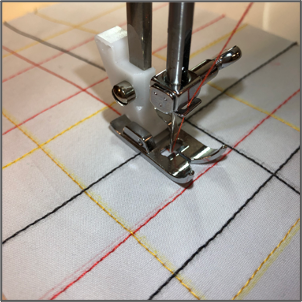
One of the wedge sections was embellished with simple straight stitching in a variety of colours, producing a “plaid” effect. Use a regular straight stitch or combine it with a straight stretch stitch, if your machine has it. A more pronounced appearance to the stitches can also be achieved using 30wt or 12wt cotton threads in place of regular sewing thread. The choice is yours!
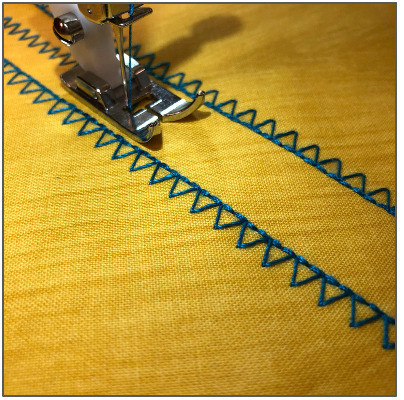
The other wedge section was embellished with several rows of zigzag and overedge stitching. If your machine doesn’t have the overedge stitch, you can create a similar look by combining a zigzag next to a straight stitch
To embellish fabric wedges, here are some tips:
- Cut the fabrics to be embellished a little larger than the pattern template. Place tear-away stabilizer underneath the fabric. This will help prevent the fabric from puckering when sewing the dense decorative stitches.
- Thread the bobbin with all-purpose thread. Thread the top of the machine with the thread desired for decorative stitching.
- It is helpful to draw stitching guidelines on the fabric using a removable fabric marker and ruler.
- Select your stitch and sew across the fabric. Sew several rows, changing thread colours as desired for the look you want for the fabric wedge.
- When all decorative stitching is finished, remove any excess stabilizer from the back of the fabric.
- Use the Wedge template, which can be found in the last pages of these instructions, to cut out all ten wedges from the assorted fabrics.
- Arrange the wedges into a circular shape on a flat surface. When you are satisfied with the arrangement, you are ready to start piecing them together. Thread the bobbin and the top of the machine with all-purpose thread. Set the machine for a straight stitch. Piece pillow front by sewing the wedges together using a ¼” seam allowance (1/4” seam allowance has already been included in the pattern template). Press seams open then set aside for now.
Note: The fabric wedges, once they have all been joined together, will leave an opening at the center of the pillow top. This will be covered up by the center applique in the steps to follow.
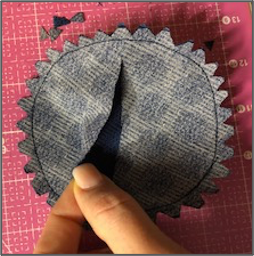
- Cut fabric for the Applique Circle using the pattern template, which can be found in the last pages of these instructions. Cut out 2 circles of cotton fabric.
- Place fabrics right sides together. Sew using a ¼” seam allowance. Trim the seam allowance with pinking shears. Cut a slit into the center of one side, being careful not to cut both layers! Turn right side out and press.
- Center the circle onto the pieced wedge pillow front, as shown. Pin in place and topstitch around the edge of the circle.
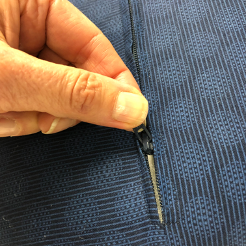
- Insert the zipper in the center seam of the pillow back sections. For tips on zipper insertion visit the SINGER® YouTube Channel for a Zipper Foot tutorial: https://www.youtube.com/watch?v=u78mq6OiYBw
- With the zipper half unzipped, place the pillow front and back pieces right sides together and pin. Stitch around the pillow using a ½” seam allowance.

- Before trimming the seam allowance, turn the pillow right side out and insert the 16” pillow form to check the fit. If the pillow cover is still a bit too large, remove the pillow form and turn the cover inside out. Stitch ¼” from the previous stitching and then try the pillow again to check the fit. When satisfied with the fit of the cover over the pillow form, use scissors to clips curves around the entire seam allowance.
- Insert the pillow form and enjoy!