
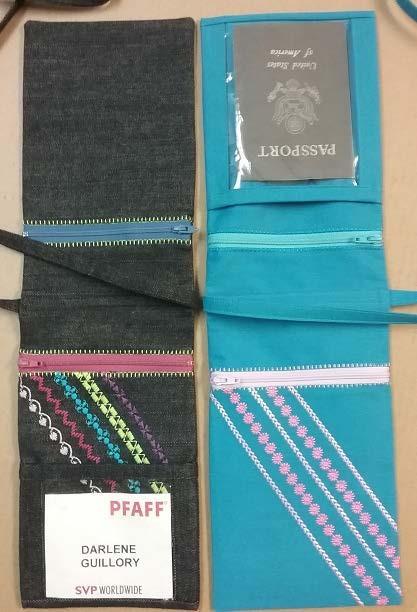
This little purse is a real winner for when you’re flying, heading to the beach, off on a cruise, or popping along to your next Sewing or Quilt Expo. It’s just the right size to keep the essentials handy – your licence, a bit of cash, credit card, or even your room key. One side features a clear pocket that’s perfect for your name badge, passport, or mobile. Wear it across your shoulder for extra security, or nice and short at the front so your name badge is easy to spot. Best of all, you’ll get to show off those gorgeous decorative stitches from your PFAFF® machine with pride.
Sewing Supplies:
- PFAFF® ¼" Quilting Foot for IDT™ System
Sewing Supplies
- PFAFF® ¼" Quilting Foot for IDT™ System P820926096
- PFAFF® Narrow Edge Foot for IDT™ system P820609096
- PFAFF® Sewing Star Foot for IDT™ system P820654096
- PFAFF® 7/9 Hole Cord Foot for IDT™ system P820608096
- ½ yard 8” wide INSPIRA® Tear-A-Way Stabilizer (white) P620112196
- or ½ yard 12” wide INSPIRA® Tear-A-Way, (black) P620113496
- ½ yard 8” wide INSPIRA® Fusible “No Show” Mesh P620111796
- ¼ yard sports weight cotton fabric @58”- 60" wide (Fabric A)
- ⅛ yard clear vinyl (medium weight)
- 2 Bright colored polyester zippers 7"- 9" or longer
- (Optional) Pearl Cotton or Pearl Crown Rayon
- (Optional) ⅛”–¼” wide ribbon
- Robison Anton 40wt. rayon embroidery thread in bright colours
- Bobbin thread
- Construction thread
- Chalk marker or another suitable fabric marker
- 1" bias tape maker
- Steam iron
- Straight pins
- Point turner
Cut :
1 piece @ 6” x 18” – purse front
1 piece @ 6” x 19” – purse back
- piece @ 2” x 60” – strap
4 pieces @ 1½” x 7” – passport pocket sides
1 piece clear vinyl @ 4½” wide x 7” high – passport pocket
or
4 pieces @ 1½” x 4” – pocket sides
1 @ 4½" wide x 4" high clear vinyl for expo name badge pocket
Prepare:
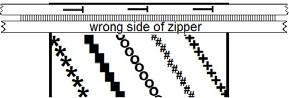
1. Cut the 6” x 18” front fabric into three pieces, just like shown in the diagram.

2. With a chalk marker (or any fabric-safe marker), draw a diagonal line across one 6” x 7” piece.

3. Pop a 7" x 8" piece of INSPIRA® Tear-A-Way Stabiliser underneath.
4. Thread up your PFAFF® with a bright embroidery thread.
5. Clip on the PFAFF® Sewing Star Foot and make sure the IDT™ system is engaged.
Sew:
1. Stitch a row of decorative stitches along the marked line – those Antique Hand Embroidery Stitches really stand out beautifully.
2. Switch to another bright decorative thread, pick a different stitch, and use the edge of the presser foot as your guide to sew another row. This is the perfect time to try out the Triple Stitch with Stitch Creator™ for a bold effect, even with the lighter stitches.
3. (Optional) Thread 9 strands of Pearl Cotton or Pearl Crown Rayon through the holes of the PFAFF® 7/9 Hole Cord Foot. Clip the foot on and engage the IDT™ system.
4. Stitch one of the 9mm wide Quilting Stitches over the cords with a contrasting embroidery thread for a striking finish.

5. (Optional) Sew a row of Ribbon Stitches, leaving enough ribbon at the start and end to tuck into the seam allowances. Or, try some Floating Stitches if you prefer.
6. Keep adding decorative touches as you like to the front of your purse.
7. Once you’re happy with the design, carefully tear away the stabiliser and press from the back.
8. Iron a 6” x 7” piece of INSPIRA® Fusible “No Show” Mesh onto the back, covering the bobbin threads. This secures your stitching and stops pencils or other items in the purse from poking through the back.
Zippers:
The zippers are sewn between each section, across the 6” width.
1. Thread your machine with construction thread in both the needle and bobbin. Snap on the 0A Foot and engage the IDT™ system. Select a straight stitch and move the needle to the far left.

2. Place the zipper face down along the top 6” edge of the embellished front piece. Line up the long edge of the zipper tape with the top edge of the fabric. The zipper may extend beyond the fabric width – you’ll trim that off later. Make sure no metal parts of the zipper sit in the ¼” side seam allowances.

3. Pin the zipper securely in place.
4. Position the top edge of the purse under the centre opening of the 0A Foot, with the zipper teeth to the left
5. Straight stitch along the length of the zipper, keeping the stitching roughly centred on the tape.

6. Repeat for the other edge of the zipper, attaching it to the 4" x 6" centre piece.

7. Sew the second zipper along the other side of the 4" x 6" piece, connecting it to the top edge of the remaining 6" x 7" purse front fabric.

Decorative Stitches Along the Zipper
- Thread your machine with a contrasting decorative thread.
- Snap on the PFAFF® Narrow Edge Foot and engage the IDT™ system.
- Select a Blanket Stitch (Width=3, Length=3).
- Sew along the zipper, using the foot guide in the seam. Move the stitch slightly to the right if needed so the forward step sits on the zipper tape, just off the edge of the fabric. The “bite” of the stitch should go into the purse fabric, away from the zipper.
- Repeat along the remaining zipper edges.
The pocket can be made 7" tall to fit a passport or cell phone, or 4" tall for a standard name badge. Steps are the same; only the height differs.Cut the vinyl either 4½" wide x 7" high, or 4½" wide x 4" high.
1.Place one side of the vinyl between two pieces of 1½” x 7” or 1½” x 4” fabric, right sides together. Do not pin through the vinyl.
2. Thread with construction thread.
3. Snap on the PFAFF® ¼" Quilting Foot and engage the IDT™ system.
4. Select a straight stitch.
5. Sew along the side edge.

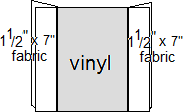
6. Repeat for the other side of the vinyl so it’s framed by fabric on both sides.
7. Fold the fabric out and finger-press the seams. Pin the outer edges together. Do not iron or pin through the vinyl!
8. Set aside.
Strap & Pocket Top Edge
1. Using a 1” bias tape maker and a hot, steam iron, press under the edges of the 58”-60" strap fabric (trim width according to your bias tape maker instructions and fabric weight).
2. Cut a 7” length from the strap for binding the top edge of the pocket.
3. Place the 7" piece over the top edge of the fabric/vinyl/fabric pocket. Trim any overhanging ends later.

4. Snap on the PFAFF® Narrow Edge Foot, engage the IDT™ system, and adjust the needle position so you catch all layers.
5. Straight stitch along the binding at the top of the pocket and set aside.
6. Topstitch along both long edges of the strap.
Adding the Pocket to the Purse
- Position the pocket on the purse front (or back if you prefer). For a passport pocket, place it on plain fabric with the passport next to your body; decorative stitches will show. For a name badge pocket, place it over embellished fabric so both stitches and the badge show.
- Pin through the fabric only, not the vinyl.
- Straight stitch ⅛" from the edge along the sides and bottom.
- Trim any excess fabric and ensure the purse is squared up.
- For a name badge pocket, stitch along the sides near the vinyl to keep the badge centred.
Assembly
1. Place one back purse fabric piece over the vinyl pocket bottom, right sides together.
2. Straight stitch ¼" seam along the bottom edge.
3. Trim the corners now (not later).
4. Fold the fabric open and temporarily to the back. You should see ¼" of fabric below the vinyl, creating a frame for the pocket.
5. Place a pin along the bottom fold through the backing fabric, head at the edges – one at each end.

6. Fold the back fabric forward at the pin line, right sides together over the front and vinyl pocket. Keep pins aligned.

7. Sew ¼" along both sides and the remaining end. Extra fabric at this end is normal.
8. Cut away the excess fabric from the end.
9. Trim excess fabric and corners on this end. Do not trim the vinyl pocket end – you already trimmed it earlier.
10. Turn the purse right side out through a zipper opening. Use a point turner for corners.
Strap
1. Cut the strap to your desired length.
2. Snap on the 0A Foot, engage the IDT™ system. Butt the ends together and join with a 3-Step Zig Zag.
3. Fold the bag in half so a zipper is on both sides.
4. Bring the joined seam of the strap to the centre and place under the purse fold. Pin in place.
5. From the back, straight stitch the strap through all layers.

Now your “Travel Purse” is ready! Wear it across your shoulder if the strap is long, or shorten it to hang around your neck. Your friends will definitely want one too – so make sure to keep these instructions safe!
We can’t wait to see what you create! Don’t forget to share them with us on Instagram, tagging @pfaffsewingaus and using the hashtags #pfaffsewingaustralia #pfaffsewing #perfectionstartshere, or on our Facebook page, Pfaff Australia.