
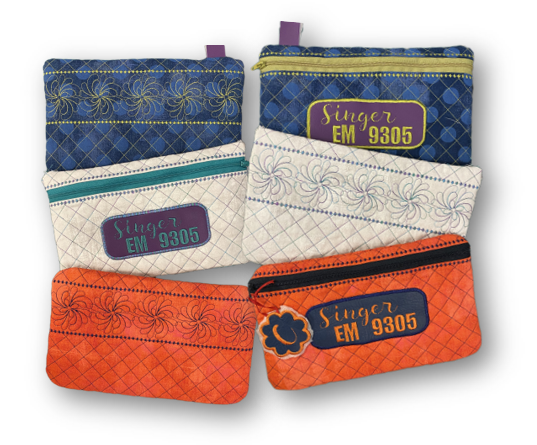
Welcome to this fun and creative In-the-Hoop Pencil Case Tutorial!
In this project, you’ll learn a variety of embroidery techniques all in one go: quilting, appliqué, and lettering—plus the magic of inserting a zipper while your project is still hooped up. It’s the perfect way to build your skills, end up with a practical project, and see just how versatile your embroidery machine can be. By the end, you’ll have a fully finished pencil case straight from the hoop, ready to use or gift!
Requirements
Hoops Required
- 240 x 150 (Included with the EM9305)
- 80 x 80 (Optional Hoop)
Fabric & Threads
- 20cm (8”) x WOF - Main Fabric
- 20cm (8”) x WOF – Fusible Pellon or Parlon
- 20cm (8”) x WOF – Lining Fabric
- 14cm (5 ½”) x 14cm (5 ½”) – Cork or Vinyl
- 1 x 30cm (12”) Nylon Dress Zip
- 1 x 30cm (12”) 3mm wide Ribbon
- 2 x (38cm x 27cm) (15”x10 ½”) Tearaway Stabiliser
- 1 x (17cm x 20cm) (6 ½”x8”) Washaway Stabiliser
- Embroidery threads in contrasting colours to your main fabric and applique lettering.
- 2 x bobbins pre-wound with bobbin fill.
Miscellaneous
- Singer EM9305 Embroidery Only Machine
- Power cord
- Fabric glue pen
- Scotch tape
- Thread snips, applique scissors, pinking shears, or quality fabric scissors
- USB stick for design transfer
Instructions
Step 1: Fabric Preparation
Measurements will now be in Imperial only.
- Cut 2 pieces of the Main Fabric 7” x 11”.
- Cut 2 pieces of Lining Fabric 7” x 11”.
- Cut 2 pieces of Pellon or Parlon 7” x 11”.
- Press 2 layers of Pellon/Parlon onto the wrong side of the main fabric.
- From one 7” x 11” main fabric piece, cut a strip measuring 1 ½” x 11”. Repeat with one lining piece. You’ll now have 3 main fabric pieces and 3 lining pieces.
Step 2: Stitching the Zipper Tag
- Hoop washaway stabiliser in the small 80 x 80 hoop.
- Retrieve the design Flower Zipper Pull. (Go to the bottom of the page for design download.)
- Add a monogram or extra design via your Singer EM9305 or embroidery software.
- Stitch Colour 1.
- Place vinyl/cork over the outline. Place the vinyl/cork so you are only stitching on the corner. This will give enough vinyl/cork to use for the applique on the front of the pencil case.
- Continue stitching Colour 1 to secure.
- If adding extra design, stitch it now.
Note: When you add an extra design in the edit screen. This design will be stitched last. To access this in the Stitch Out screen, skip Colour 2 and start on the next Colour. This will be the design you added in. Once you have finished stitching your added design, touch Colour 2 to resume your embroidery.
8. Place another vinyl/cork piece underneath the hoop (wrong side against stabiliser).
9. Stitch Colour 2.
10. Trim excess fabric above and below, close to the stitch line (do not cut stitches).
11. Complete Colour 2.
12. Remove, trim stabiliser, and rinse excess.
13. Punch a hole and insert ribbon for your zipper pull.

Step 3: Stitching the Back Panel
- Hoop tearaway stabiliser in the 240 x 150 hoop.
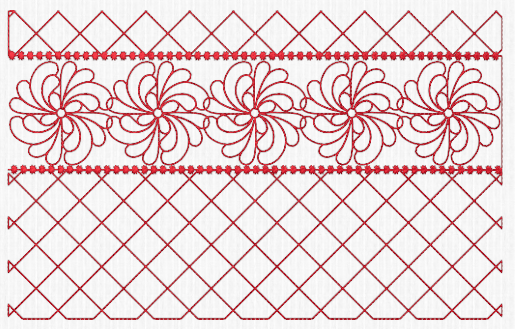
- Retrieve the design Quilted Back Panel.
- Place main fabric (7” x 11”) right side up over the hoop. Centre in place.
- Use the Baste Around the Design function on the machine to hold the fabric in place.
- Stitch out the monochrome (one colour) design.
- Remove from hoop and place to the side.
Step 4: Stitching the Front Panel
- Hoop tearaway stabiliser in the 240 x 150 hoop.
- Retrieve the design Quilted Front Panel.
- Add lettering (perfect for personalising with your Singer EM9305). Refer to your manual to insert Fonts built into your machine.
- Stitch Colour 1 on the stabiliser only – this marks zipper placement.
- Lay zip with teeth right side up in the stitched outline. Ensure zipper pull and ends extend past stitching lines. Secure with fabric glue or tape.
- Slow the speed down on the machine and stitch Colour 2 to hold the zip in place.
- Remove the hoop from the embroidery arm, (do not unhoop the fabric!) and place the lining fabric 1 ½”x11” piece right side down with the edge lined up with the zig zag. The excess will lay over the zip section. Use fabric glue to hold the piece of fabric in place.
- Replace hoop and stitch Colour 3.
- Flip fabric up, glue or tape in place.
- Place lining piece 5 ½” x 11” over lower zip section, glue, and stitch Colour 3.
- Repeat process with main fabric pieces, flipping and stitching each section. This is done on the right side of the hoop.
- Ensure fabrics are glued or taped down before stitching Colour 4 (quilting, candlewicking, and applique).
- The machine will stop near the end of Colour 4 and wait for the vinyl/cork to be placed over the outline.
- Place the vinyl/cork over the outline and continue to stitch.
- When the machine stops again, trim away the excess vinyl/cork close to the stitch line.
- Continue to stitch for the satin stitch edging.
- Skip to the lettering in the design and stitch.
- Open the zip halfway (important!).
- Place quilted back panel, right sides down aligning edges, and stitch Colour 5.
- Remove hoop, place lining (7” x 11”) right side against the back of the hoop, glue or tape in place.
- Stitch Colour 6 – this secures lining but leaves a turning gap.
- Remove and trim ¼” around edges. Snip into curves for a neat finish.
- Turn through and stitch gap closed. This can be done on your Singer Sewing Machine.
- Attach zipper pull – your Pretty Pencil Case is complete!
Download VP3 designs
Why You’ll Love This Project
This tutorial is a fantastic way to:
- Practise zipper installation with your embroidery machine
- Experiment with vinyl, cork, and applique
- Customise with monograms or lettering
- Create a practical, gift-worthy project
This pencil case is a fun way to sharpen your embroidery skills while making something useful on the Singer EM9305 embroidery machine.
Tip: Try stitching this design in different fabrics and colours for makeup bags, travel cases, or sewing supply pouches.