
Why this foot: Invisible zippers have a reputation for being intimidating — but with the right tools, they’re one of the neatest and most professional finishes you can add to your sewing projects. Whether you’re making a dress, skirt, or cushion cover, the Pfaff Invisible Zipper Foot takes the guesswork out of sewing this advanced-looking technique.
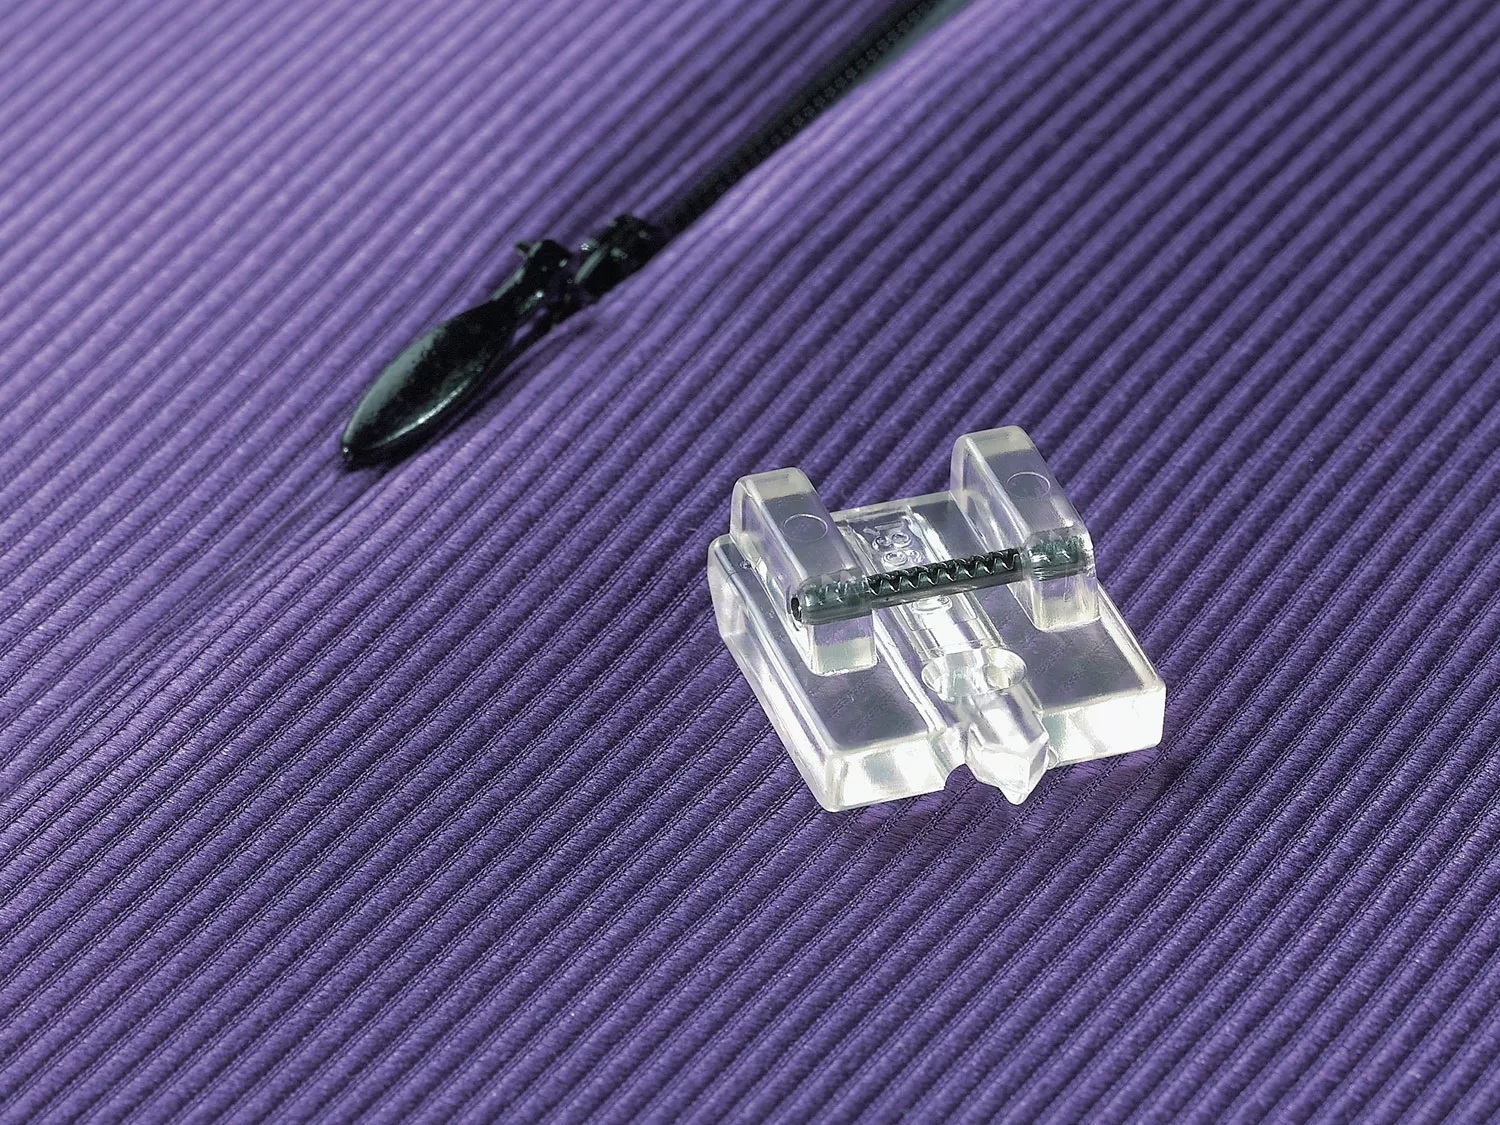
The Pfaff Invisible Zipper Foot is specially designed with two grooves underneath. These grooves gently roll back the zipper coils while you sew, guiding your stitches right up against the teeth without catching them. The result? A zipper that disappears seamlessly into your garment — no ripples, no visible stitches, and no frustration. Trying to sew an invisible zipper with a standard presser foot often leaves gaps or uneven tension. With this foot, the process is smooth, precise, and repeatable.
Machine Requirements
- All PFAFF sewing machines
Other tools
- Invisible zipper, P8204740-96, in a matching length and colour
- Regular zipper foot, 4, (for sewing the seam just below the zipper)
- Standard presser foot, 0A, (for completing the seam)
- Fabric of choice (light to medium weight wovens works best for a first try)
- Pins, clips, or a fabric glue stick (for securing the zipper in place)
- Iron (to press zipper coils open before sewing)
Sewing Instructions
Step 1: Prepare your zipper
Press your invisible zipper gently with a warm iron, rolling the coils open slightly. This makes it easier for your zipper foot to stitch close to the teeth for a flawless finish.
Step 2: Position Your Zipper
Open the zipper, thenplace it face down along the edge of your fabric seam, aligning the zipper tape with your raw edge. Pin, clip, or use a fabric glue stick to hold it in place.
Step 3: Stitch the First Side
Attach the Pfaff Invisible Zipper Foot. Position the zipper coil into the groove on the underside of the foot and sew slowly, guiding the coil so your stitches sit right beside it. Pro tip: don’t stretch the zipper tape or your fabric as you sew — this can cause ripples.
I like to first sew with a slightly elongated stitch length as a “test run.” This allows me to check placement and alignment before going back in with my regular stitch length to secure the zipper permanently.
Step 4: Secure & Stitch the Second Side
This step can feel a little confusing — it’s easy to accidentally twist the zipper tape. To avoid that, zip the zipper closed first. Lay it down on the fabric so the second side naturally aligns in the right direction. Then, unzip it again before sewing. This ensures your zipper isn’t twisted when finished.
If your zipper crosses over a seam (for example, a waist seam where the zipper continues from the bodice into the skirt), mark where the first side meets that seam. Transfer that mark across to the second side and line it up before securing. This guarantees your horizontal seams match perfectly once the zipper is sewn in. Secure the second side with pins, clips, basting, or a fabric glue stick. Double-check that the top edges of the zipper align. Just like with the first side, I recommend sewing with an elongated stitch first to test placement. Once you’re happy, sew again with your regular stitch length.
Step 5: Finish the Seam Below the Zipper
With both sides stitched in, switch to a regular zipper foot. Starting just below where your invisible zipper stitches ended, sew the seam closed. The regular zipper foot allows you to get close to the base of the zipper for a smooth join. Once you’ve cleared the zipper area, swap back to your standard presser foot and continue sewing the remainder of the seam as usual. Backstitch to secure.
Where to use invisible zippers:
- Dresses: Especially in the side or back seam for a polished finish.
- Skirts: A waistband with an invisible zipper looks seamless and sophisticated.
- Pants & Jumpsuits: Great for side closures that don’t break up the silhouette.
- Cushion Covers & Home Décor: Adds a high-end finish without visible hardware.
- Formalwear: Evening gowns, bridal wear, and tailored pieces often rely on invisible zippers for that flawless appearance.
Final Tips
Even with careful sewing, invisible zippers can sometimes be tricky. Here’s how to fix the most common issues:
● Gap at the bottom where the zipper meets the seam:
Switch to your regular zipper foot and restitch closer to the zipper base. If there’s still a tiny opening, you can hand-sew a few invisible stitches to close the gap neatly.
● Rippled or wavy zipper seam:
This usually means the zipper tape or fabric was stretched while sewing. Always let the machine feed both layers evenly and avoid pulling. Pressing the seam gently with steam can sometimes help flatten out minor ripples.
● Seams not matching across the zipper (e.g., waistline seam):
Unpick just the problem area on the second side, realign using the markings you made, and resew that section. Taking the time to mark both sides before sewing saves this headache.
● Zipper won’t close smoothly:
If stitches are too close to the zipper coil, the slider may snag. Unpick the affected section and resew slightly further from the teeth.
● Zipper tape visible from the outside:
This happens if you didn’t roll the coil open enough while sewing. Next time, press the coils flat and make sure the groove of the zipper foot is properly guiding the teeth back as you stitch.
Invisible zippers don’t have to be intimidating. With the Pfaff Invisible Zipper Foot — and smart techniques like pressing the coils, securing with glue, and finishing with the right presser feet — you can achieve a flawless, professional result every time.
Happy sewing!
— Gracie
Congratulations on finishing your project!
We can’t wait to see what you create! Don’t forget to share them with us on Instagram, tagging @pfaffsewingaus and using the hashtags #pfaffsewingaustralia #pfaffsewing #perfectionstartshere or our Facebook page Pfaff Australia