
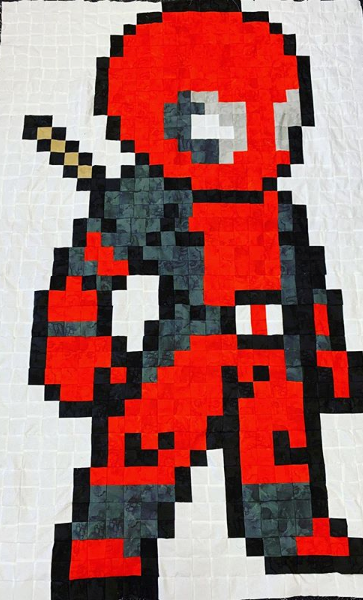
Zip-a-dee-doo-dah, Zip-a-dee-ay, create a quilt featuring the mercenary with attitude!
This is a great quilt for beginners, and it is made even easier thanks to the AccuQuilt fabric cutting system.
Finished size is a single bed quilt
NOTE: This is an unconventional method of constructing a quilt. It was done this way as we did this as a group project and got numerous people do construct 1 x 4 patch block each.
Requirements List:
- White Fabric: 2.8m
- Red Fabric: 1.5m
- Light Grey Fabric: 0.20m
- Dark Grey Fabric: 0.75m
- Brown Fabric: .20m (4 squares)
- Sewing machine
- Co-ordinating thread
- Quarter-inch foot (HP31461 plastic or 321417008 metal)
- Optional: GO! Big or GO! Fabric Cutter
- Optional: GO! Square – 2 ½” multiples (AQ55059)
Cutting:
- For white fabric you will need to cut 201 2 ½” (6.35cm) squares
- Using the GO! Fabric cutter and the Square – 2 ½” multiples (AQ55059) die cut 6 layers of fabric at a time until you have 201 squares.
- For red fabric you will need to cut 276 2 ½” (6.35cm) squares
- Using the GO! Fabric cutter and the Square – 2 ½” multiples (AQ55059) die cut 6 layers of fabric at a time until you have 276 squares.
- For light grey fabric you will need to cut 18 2 ½” (6.35cm) squares
- Using the GO! Fabric cutter and the Square – 2 ½” multiples (AQ55059) die cut 6 layers of fabric at a time until you have 276 squares.
- For dark grey fabric you will need to cut 133 2 ½” (6.35cm) squares
- Using the GO! Fabric cutter and the Square – 2 ½” multiples (AQ55059) die cut 6 layers of fabric at a time until you have 276 squares.
- For brown fabric, you will need to cut 4 2 ½” (6.35cm) squares
- Using the GO! Fabric cutter and the Square – 2 ½” multiples (AQ55059) die cut 6 layers of fabric at a time until you have 276 squares.
Construction:
NOTE: Seam allowance is ¼” Unless otherwise stated. When pressing your seams, press them in opposite directions. This will help reduce bulk.
- Place squares together as shown. Sew and press. Repeat for the other two squares.

- Join pieces together, sew and press.

- Repeat the steps 1 and 2 following the quilt diagram for colour position for blocks in rows A to T and columns 1 to 13.

- For row U and column 14, you will notice here they are only two wide. Place squares together as shown. Sew and press.
- Repeat step 4 for all blocks in row U and column 14. These pieces have been included to be joined into each row below.
- Once you have all of your blocks sewn together, we will now assemble the rows.
- Row A: Join each block until you have row A completed.

- Row B: Join each block until you have row B completed.

- Row C: Join each block until you have row C completed.

- Row D: Join each block until you have row D completed.

- Row E: Join each block until you have row E completed.

- Row F: Join each block until you have row F completed.

- Row G: Join each block until you have row G completed.

- Row H: Join each block until you have row H completed.

- Row I: Join each block until you have row I completed.

- Row J: Join each block until you have row J completed.

- Row K: Join each block until you have row K completed.

- Row L: Join each block until you have row L completed.

- Row M: M Join each block until you have row M completed.

- Row N: Join each block until you have row N completed.

- Row O: Join each block until you have row O completed.

- Row P: Join each block until you have row P completed.

- Row Q: Join each block until you have row Q completed.

- Row R: Join each block until you have row R completed.

- Row S: Join each block until you have row S completed.

- Row T: Join each block until you have row T completed

- Row U: Join each block until you have row U completed.
![]()
- Once you have all of your rows sewn together arrange on your design board.
- Begin to sew each row together pinning at the seams to ensure you have it lined up. Repeat until it is all sewn together.
Finishing
- Layer wadding between quilt top and backing
- Pin or baste layers together
- Quilt as desired. Add binding, mitring corners.