
The Satin Stitch Foot, is also sometimes called an "applique" or "special purpose" foot, is used for sewing decorative stitching or surface embellishments on many types of projects.
The Satin Stitch Foot has a tunnel or groove on the underside which allows the foot to glide freely over decorative or heavy stitching.
Using this foot helps to keep the stitches from becoming distorted. Most versions of the Satin Stitch Foot are transparent, allowing you to see through the foot as you stitch.
There are many uses for the Satin Stitch Foot.
The most common use is for sewing any decorative or satin type stitch. Sewing machines today often come with an assortment of decorative stitches and using them can really add pizazz to your projects. It's also fun to use one of the many machine embroidery threads on the market to enhance the decorative stitches. 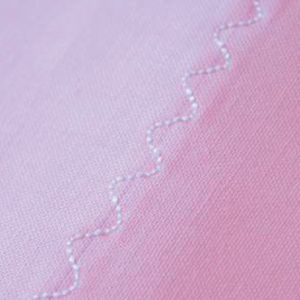 Machine embroidery threads come in different thicknesses, sheens and textures.
Just be sure to use the correct needle for the type of thread and fabric you are using. If the project you are making is not reversible, it's recommended to use a lighter "bobbin" thread in the bobbin. This helps to eliminate bulk on the underside of the fabric and keep the fabric soft and pliable.
Tip: To add stability to the fabric during the stitching process, always use a fabric stabilizer underneath the fabric. This will keep the stitches from "tunneling" and the fabric from puckering. Most stabilizers are removed after sewing.If desired, mark temporary guidelines onto the fabric with a fabric marking tool before starting to sew. The Satin Stitch Foot has a center marking in the front that can be placed on the guideline to help keep the foot aligned while sewing. When the stitching is finished, remove the lines and stabilizer as recommended by the manufacturer.
Tip: When decorative stitching, loosen the upper thread tension slightly. This draws the upper thread down underneath the fabric which helps the stitches appear smoother. This will also eliminate any bobbin thread from being seen on the right side of the fabric.
 Rows and rows of dense stitching can be sewn to create surface embellishment.
Try using heavy weight threads and a larger needle to create surface texture with decorative stitches.
The stitch length settings will vary, depending on the weight of the thread being used.
Sometimes just adding a row or multiple rows of satin stitching is all that is needed to embellish your fabric. "Satin" stitching is simply zig zag stitching that is close together. Adjust the stitch length down so that the stitches are very close together; close enough so that no fabric shows through the stitching, but no so close that the fabric doesn't want to feed. Vary the width of the stitch to add interest. 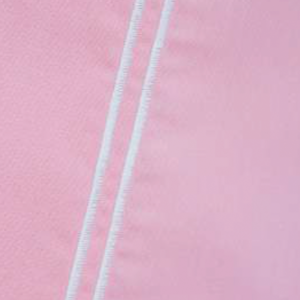 This is a quick and simple treatment to embellish the hem of a pillow case.
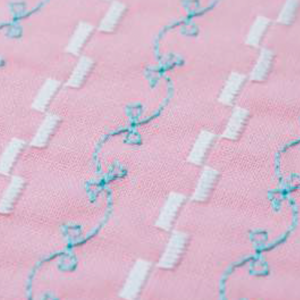
Sewing Inspiration Applique - Another common use for the Satin Stitch Foot is applique. Applique is a decorative cut out shape of fabric that is applied to a foundation or base fabric. The edges of the applique are usually satin stitched to enclose the raw edges.
Place tear-away stabilizer under the base fabric. Secure the fabric shape to the base fabric with either a double-sided fusible web or with fabric spray adhesive. Then, stitch around the applique with the satin stitch, stopping to pivot the fabric at the corners or to negotiate the curves. Be sure that the stitches straddle the raw edge of the applique so that the raw edges are enclosed.
Attach Ribbons or Narrow Trims - The Satin Foot is useful when attaching narrow ribbons and trims to fabric surfaces.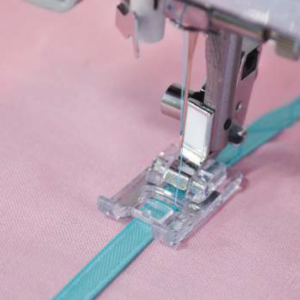 The groove under the foot provides a channel so that the ribbons can pass freely under the foot. The groove also acts like a guide to help the ribbons stay in place as you sew.
Place stabilizer under the fabric. Once again you may wish to mark a guideline on the fabric to help when positioning the ribbon. Select a decorative stitch or zig zag stitch. Adjust the width of the stitch so that it is wide enough to cover the width of the ribbon. Feed the ribbon under the presser foot, bringing the ribbon towards the back of the machine and stitch in place.
Try using different stitches to create interesting combinations. Image the possibilities!
Attach Elastic - The satin stitch foot is also helpful when attaching narrow elastic to the fabric. Once again the groove under the foot provides a nice guide to hold the elastic in place while sewing.
Mark the stitching line with a fabric marker and select a zig zag or triple zig zag stitch. Set the width so that it is wide enough to cover the width of the elastic.
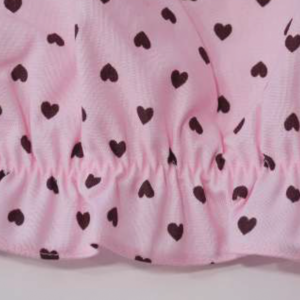 Feed the end of the elastic under the presser foot. Take a few stitched to secure the elastic to the fabric, leave the thread tails long enough to expose the end of the elastic. Then pull the elastic taut to apply a little stretch to the elastic; hang onto the thread tails in the back with one hand and the elastic in the front with the other hand and the elastic in the front with the other hand. Continue sewing. The amount of stretch in the elastic will be determined by how tightly you hold onto the elastic while sewing.
Place tear-away stabilizer under the base fabric. Secure the fabric shape to the base fabric with either a double-sided fusible web or with fabric spray adhesive. Then, stitch around the applique with the satin stitch, stopping to pivot the fabric at the corners or to negotiate the curves. Be sure that the stitches straddle the raw edge of the applique so that the raw edges are enclosed.
Attach Ribbons or Narrow Trims - The Satin Foot is useful when attaching narrow ribbons and trims to fabric surfaces.
The groove under the foot provides a channel so that the ribbons can pass freely under the foot. The groove also acts like a guide to help the ribbons stay in place as you sew.Place stabilizer under the fabric. Once again you may wish to mark a guideline on the fabric to help when positioning the ribbon. Select a decorative stitch or zig zag stitch. Adjust the width of the stitch so that it is wide enough to cover the width of the ribbon. Feed the ribbon under the presser foot, bringing the ribbon towards the back of the machine and stitch in place.
Try using different stitches to create interesting combinations. Image the possibilities!
Attach Elastic - The satin stitch foot is also helpful when attaching narrow elastic to the fabric. Once again the groove under the foot provides a nice guide to hold the elastic in place while sewing.
Mark the stitching line with a fabric marker and select a zig zag or triple zig zag stitch. Set the width so that it is wide enough to cover the width of the elastic.
Feed the end of the elastic under the presser foot. Take a few stitched to secure the elastic to the fabric, leave the thread tails long enough to expose the end of the elastic. Then pull the elastic taut to apply a little stretch to the elastic; hang onto the thread tails in the back with one hand and the elastic in the front with the other hand and the elastic in the front with the other hand. Continue sewing. The amount of stretch in the elastic will be determined by how tightly you hold onto the elastic while sewing.