
Happy New Year Singerettes! I hope you all had a great Christmas and that Santa brought you lots of sewing goodies.
I used part of my Christmas break to finally finish the Resignations Coat which I’ve been working on for much longer than I intended!
It’s hard to sew a wool coat when it’s so nice and hot outside plus I hit a few snags along the way. Now that it’s done I’m actually really proud of it and looking forward to wearing it this winter...not that I want to hurry winter along, summer can hang around as long as it wants!
When I left you last post the buttonholes were all done, shell and lining were complete (minus a few fitting tweaks) and my new zippers had just arrived...oh and I had a lot of hand stitching ahead of me!
That was all completed on the trusty Singer Simple 3223, we pick the action back up on the new Singer Stylist 9100.
The zippers I ordered were too long but being metal it was an easy job to shorten them.
It feels a little wrong, basically wrecking something that’s brand new, but it’s also fun because you get to sew with tools.
Take a deep breath, let's do this!
- Gather your tools: Fabric scissors or pinking shears, needle nose pliers, diagonal cutting pliers (I have mini ones), some eye protection is a good idea too.

- First we need to mark the length we require. My final zipper length is 12cms. I’ve measured from the bottom and marked the tape with chalk, this will be the new top of our soon-to-be shortened zipper.
- Now for the fun part! We need to remove about 2cms of the zipper teeth above this mark.
- Open your zipper all the way.
- Each zipper tooth is like a little clamp on the tape with a bubble end. Use the diagonal cutters to snip the bubble off the end of one of the zipper teeth. Try not to catch the zipper tape. Little bites are best.

- Next remove the side sections of the tooth (sometimes these fly off on their own).
- Keep going until you’ve removed enough teeth.
- Now remove the stops from the top of the zipper. Use the needle nose pliers to carefully fold them open. Try not to bend them anymore than is necessary.
- Re-attach the stops at the chalk marks, right above the last tooth on each side.
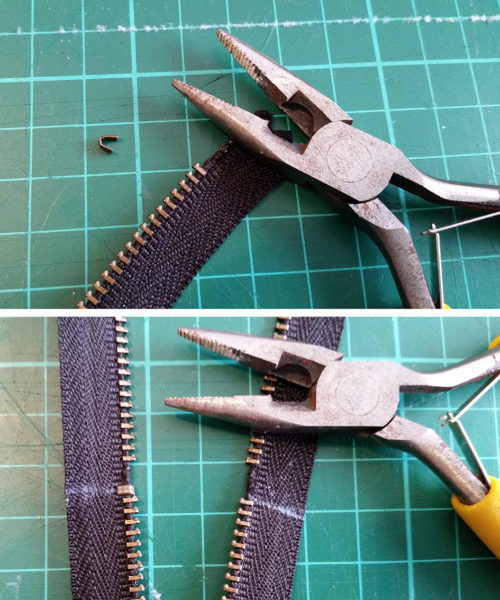
Close the zipper and check the length.- Now you can trim off the excess zipper tape with pinking shears or regular fabric scissors.
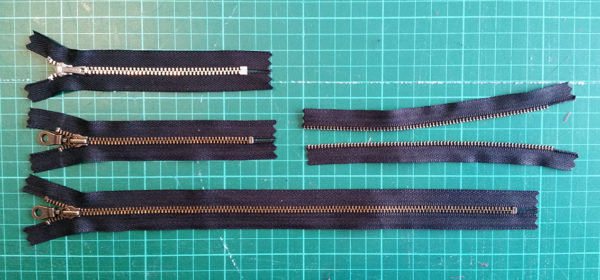
- Repeat for zipper number two!


Inserting the zippers into the sleeves was easier than I expected. I used leftover scraps from my lining to create the vent which allowed me to get a nice crisp edge. It was a little fiddly and slippery pinning everything in place so I recommend basting first.
Once the zippers were in place I sewed the last sleeve seam and then pressed and hand-stitched the sleeve hem in place.
The trickiest past was actually setting in the sleeves. One sleeve went in perfectly the first time, the other sleeve just didn’t want to cooperate. I set it and unpicked it 3 or 4 times over two weekends. I was getting really mad at that stupid sleeve. I finally sorted it out and then put the shoulder pads and sleeve heads in which helped both sleeves sit much better. 
Don't be afraid to use shoulder pads in your coats. They are more than just a crazy 80s fad, for a wool coat such as this they compensate for the weight of the fabric, keeping the shoulders nice and square.
I'd never used sleeve heads before this project but they also help add some structure to the head of the sleeve, stopping it from hollowing out. No one wants hollow sleeve heads!
Now I was on the home straight. I wasn't looking forward to the hemming - with all those pleats that hem is loooong! If you haven’t worked it out by now I really don’t like hand stitching. Mostly because I’m really bad at it. And I’m really bad at it because I don’t do it very often. It’s the circle of sewing life. Also, I own 14 sewing machines! I like to sew by machine, haha.
So I started with the buttons.
I sewed the outside buttons on first, lining them up with the bound buttonholes. Next I began to attach the buttons under the bound buttonholes but no matter how I spaced them every time I closed up the coat the front kept bubbling up. I eventually realised that my bound buttonholes are quite thick and because I was sewing the buttons hard onto the coat front there was no space under the buttons for fabric to go.
So I cut all the buttons off sewed them on again making thread shanks under each button. I used my double eyed needle placed across the front of the button. Because they are slightly concave this gave me the perfect amount of spacing.
And then there was nothing left to do but hem! It actually wasn’t too bad. I did a bit of hand sewing before Christmas, working on some decorations and a soft toy for a present, so I think the practice paid off. The thick wool and interfacing made it easy to hem the wool outer and then I attached the silk to the wool using tiny, neatly spaced fell stitch and you can hardly see it.
Phew!
So my coat is finished and all that remained was to get photos of it...all 220 of them, half of which were out of focus.
Photographing black garments is tricky!

I'm quite proud of my sleeve zippers.
And here is the back view:
So despite a few setbacks I really am very happy with my coat and both the Simple 3223 and the Stylist 9100 did an excellent job. Looking out my window earlier today, I might get to wear my coat sooner than expected...
 Happy sewing xx