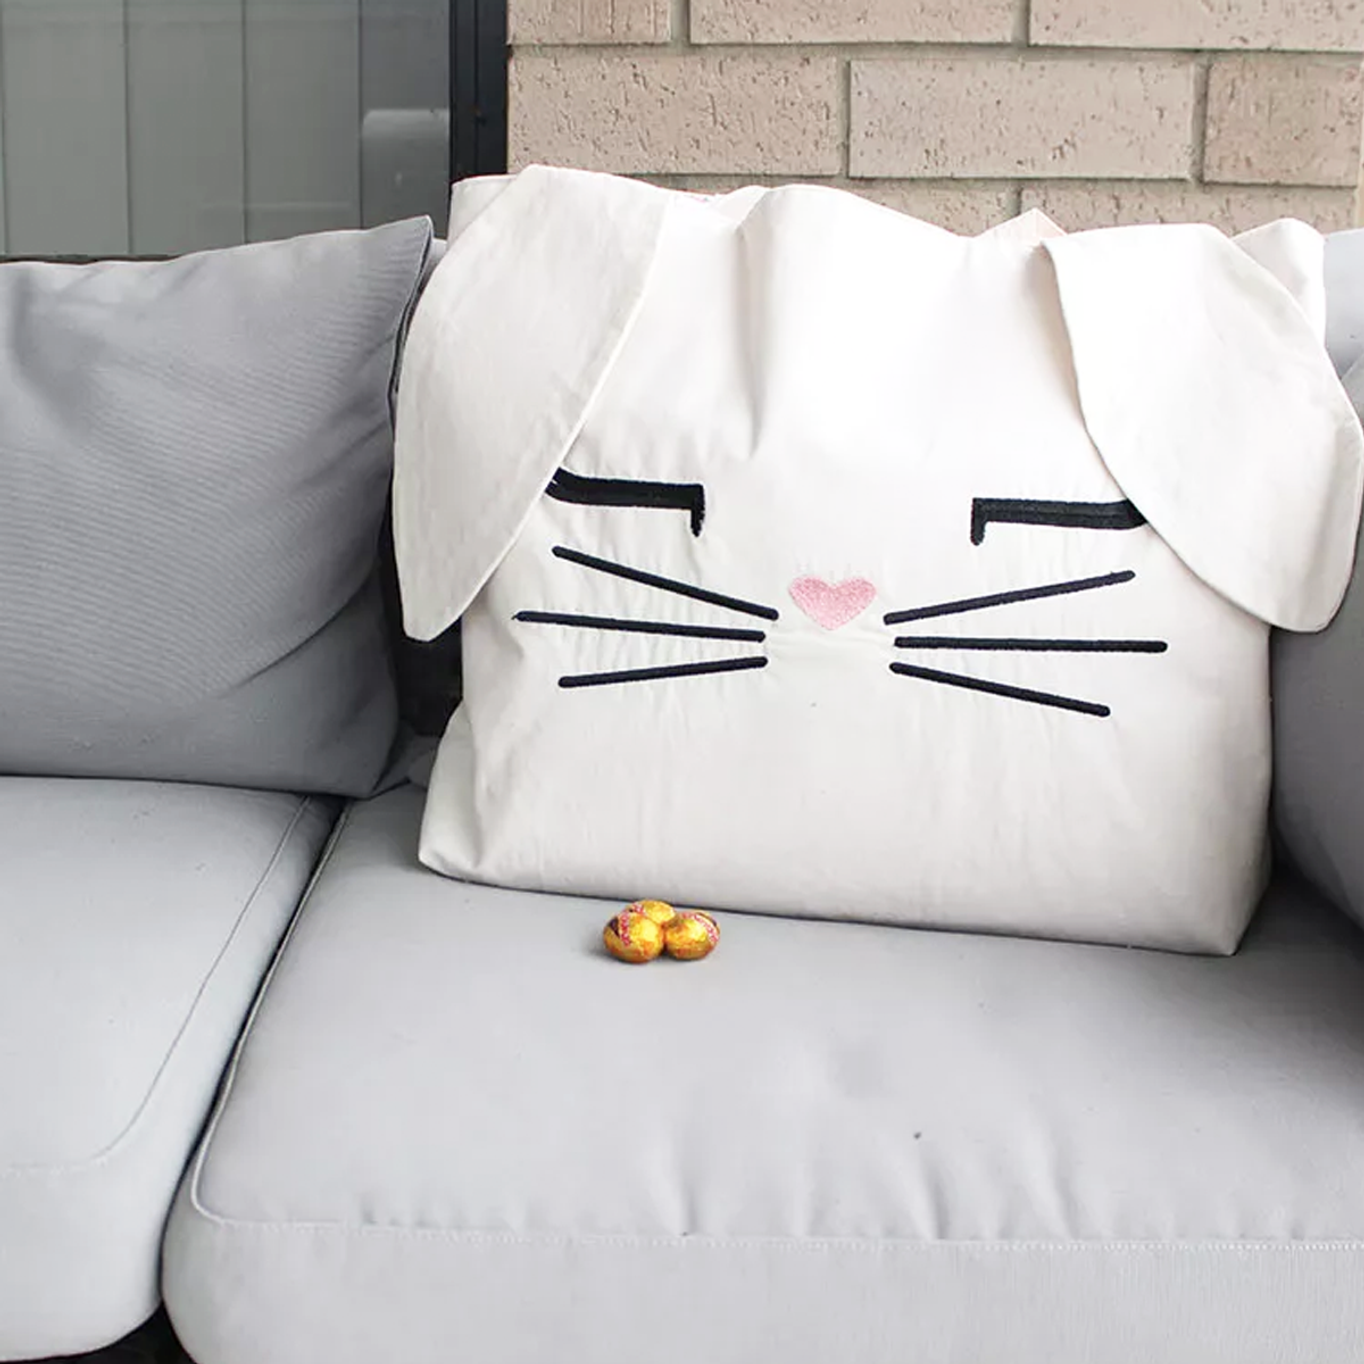
It is almost Easter time! It is the perfect time to create a super cute re-useable Easter Bunny Tote Bag!
The instructions for the embroidery in this project are using the EM9305 Embroidery Only Machine.
Requirements Lists:
- Embroidery machine + sewing machine
- Sweet bunny Face (UT18716) design from Urban Threads.
- If splitting the design: Premier +2 Embroidery Extra or similar software.
- Tear-A-Way Stabiliser
- Pink Embroidery thread for bunny nose
- Black Embroidery thread for bunny face
- Bobbinfil
- Vliesofix (for ear applique)
- Fabric marking tool and ruler
- Co-ordinating all-purpose thread for bag construction.
- 1 Meter fabric for the outer bag
- 1 Meter fabric for the outer bag
- 1 Meter firm Fusible interfacing
- Hand sewing needle
- 1 Piece of cardboard cut to 37cm x 9cm
- Bunny ear templates
Fabric Preparation:
- Cut one 51cm x 82cm piece of outer fabric for bag.
- Cut two 66cm x 8cm pieces from your outer fabric for the handles.
- Cut one 51cm x 82cm Piece of lining fabric for bag.
- Cut one 11cm x 76cm to cover cardboard.
- Cut one 51cm x 82cm Piece of firm interfacing.
- Cut Rabbit earpieces, using templates. You should have in total 4 outer earpieces and 2 inner earpieces.
- Place fusible interfacing on the wrong side of the outer bag fabric and fuse, following manufacturer’s directions.
- Fold the above outer piece with the interfacing fused to it in half so it measures 51cm x 41cm. Mark the front. This will be part of the rectangle that the embroidery will be stitched onto.
Embroidery Design Preparation:
- Purchase design. We have used the 11.73”W x 4.88”H (298 x 124mm) size. This is too big for the hoop, but we are going to split it into multiple hooping’s, if you don’t want to do this you can select a size that does fit in a single hooping.
If you are doing the design in a single Hooping jump down to the Embroidery stitch out section, omitting the second hooping, as you have chosen a size that fits in a single hoop.
Splitting Design in Premier + 2
- Click File, Open. (The hoop size shows the whole project, not the hoop which will be selected before stitching out.
- Find your Sweet Bunny Face embroidery design and select it.
- Click split project. The Split Embroidery page of the Split Project Wizard will appear.
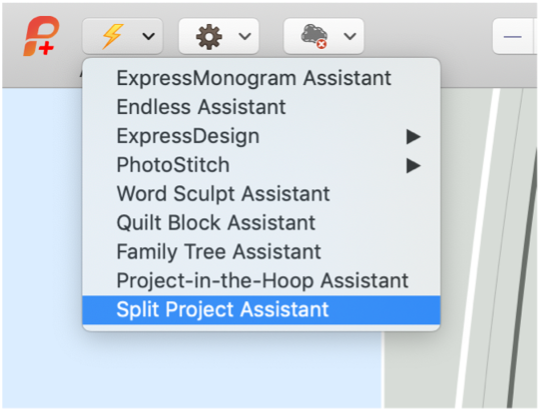
- Click Change Hoop to select the hoop and its orientation. The Hoop Selection dialog box will appear.
- In the Hoop Selection dialog box, select universal from the drop-down list.
- From the hoop Size drop-down list, select the 240 x 150mm
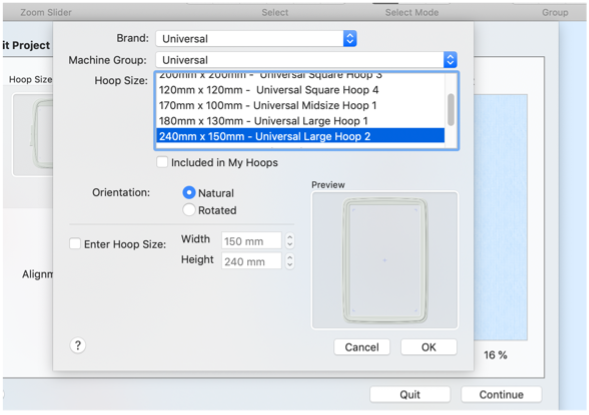
- Click OK.
- Now select settings for splitting the embroidery.
- Check that the Intelligent Split Method is selected.
- For Alignment Stitch style select Corner.
- Check that the connection is set to Trim.
- Leave the Overlap at the default of 50mm.
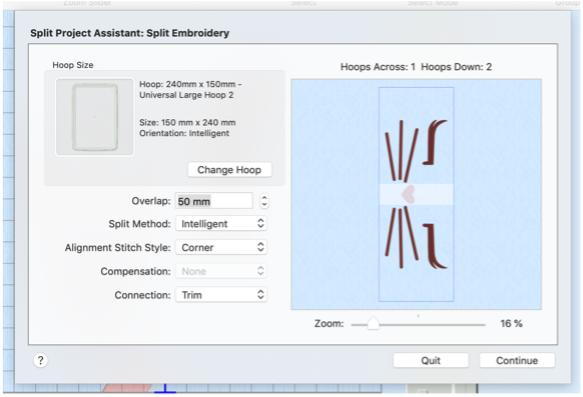
- Click Next. The save Embroidery page appears.
- You can view both parts of the design by using the arrow buttons. Check that the design looks correct.
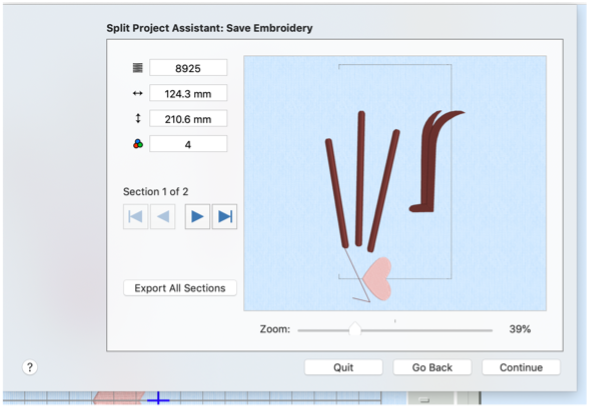
- Click Export All Sections to save as numbered sections. The save as dialog will appear. Choose file format .vp3 and select OK.
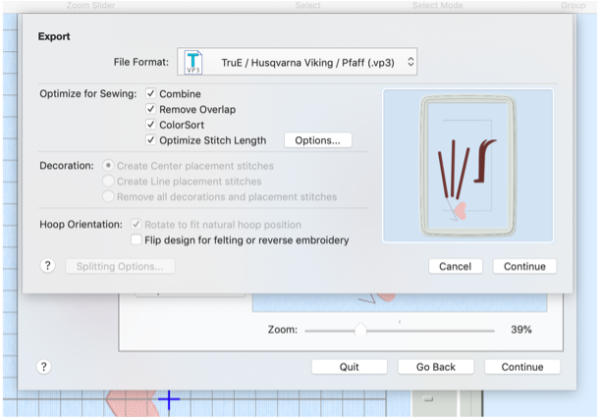
- In the name file box, enter name “Bunny Face”, then click export. The files will be saves as Bunny Face_1 and Bunny Face_2
- Click Finish to close the Split Project Wizard.
Embroidery Stitch-out:
Button diagrams are included in the downloadable pattern file.
- Load the 2 designs onto a USB stick.
- Bunny Face 1
- Bunny Face 2
- Insert the USB into the machine.
- Select the Start Menu.
- Touch the File Manager icon.
- Select the Drop Down Menu beside.
- Go to the USB option.
- Long touch the first design required ‘Bunny Face 1’. This is the design without the heart shaped nose in it.
- The design will load onto the edit screen.
- Ensure the hoop size is 240 x 150. If not, go to the Hoop icon and choose the hoop.
Do not put the hoop onto the embroidery arm at this stage. - Select to take you through to the Stitch Out screen. The machine will calibrate the embroidery arm if this is the first time you have gone to Stitch Out after turning the machine on. The machine will also warn you to remove the hoop and ensure you have attached the correct foot. Press OK.
Once the embroidery arm has moved into position, you can slide the embroidery hoop onto the mechanism. - Hoop the fabric and tearaway with the centre point of the design 2 ½” from the bottom of the hoop as pictured.
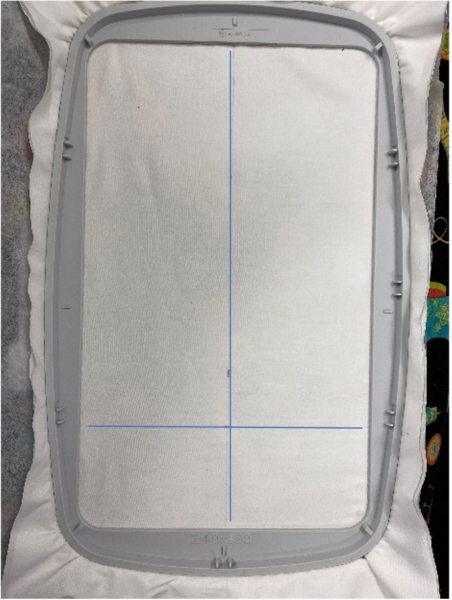
- To ensure the design stitches in the correct position, go to Basic Design Positioning.
- Select Step 1. A red cursor will appear on the screen.
- Touch the screen with the stylus and drag it to line up with bottom left corner mark on the screen.
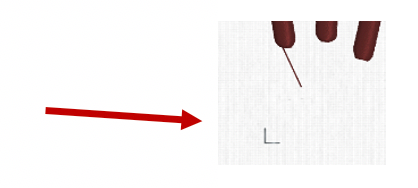
- To ensure accuracy select the button on the bottom right hand side of the screen.
- Select the Zoom icon.
- A new set of icons will appear on the right hand side of the screen.
- To zoom in on the cursor select Zoom to Cursor.
- The screen will now display a close up of the cursor and corner marking. If your red cursor is not exactly where it needs to be then select the icon again.
- Press Design Placement Options and move the red cursor into position.
- Now select Step 2. This will move the locked point on the fabric.
At this point, you are watching where the needle is positioned on the fabric NOT the screen of the machine.
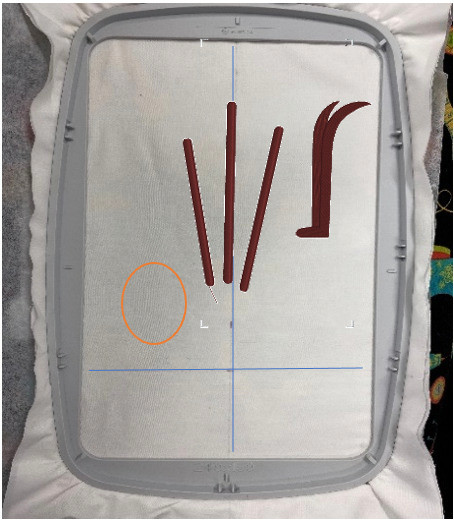
- Place the stylus on the screen of the machine and move until the needle is lined up with the 2” line. Keep the needle in the upright position while moving. Once close to the centre wind the flywheel down to lower the needle and check you are in the correct position. Once in position, lift the needle into the upright position.
- To move the screen out of the zoomed in position, go to the icon and select the Zoom icon.
- This time choose the Zoom to Hoop icon.
This will position the design vertically in the hoop. The next step will position it horizontally. - Select Step 1 again to see the Red Crosshair on the screen again and now select the Centre Position. This will move the Red Crosshair to the Centre of the Design.
- Touch Step 2 to lock the cross hair in place. Use the Side Arrows underneath the screen and move the design so the centre crosshair meets the centre line. Only move left and right NOT up and down.
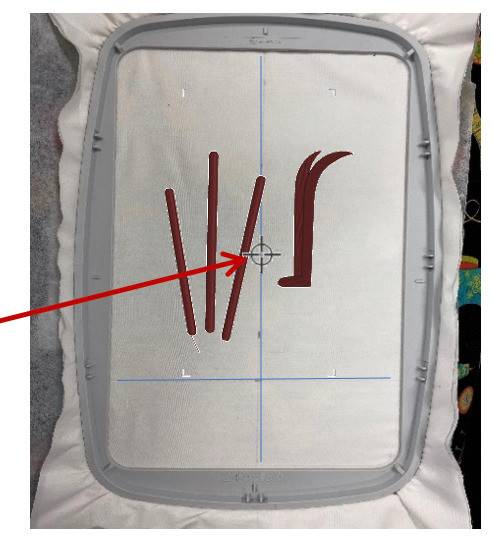
- Press the green tick at the top right hand side of the screen to accept the position of the design.
- Stitch out each colour change in the same colour. Two of the colours will stitch out alignment stitches. These can be in the same colour as the eye & whiskers.
- Once the design is finished, press the to say the embroidery is finished.
- Remove the hoop from the embroidery arm and select Return to Embroidery Edit.
- Rehoop the design with the centre position 2” down from the top of the hoop.
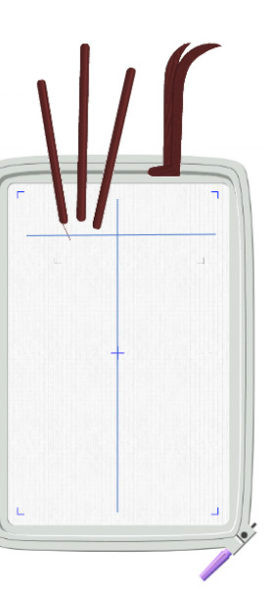
- Touch the first design on the screen to ensure a selection box appears around the outside.
- Select Delete to remove the design from the screen.
- Select the Start Menu.
- Touch the File Manager icon.
- Long touch the first design required ‘Bunny Face 2’. This is the design with the heart shaped nose in it.
- The design will load onto the edit screen.
- Ensure the hoop size is 240 x 150. If not, go to the Hoop icon and choose the hoop.
Do not put the hoop onto the embroidery arm at this stage. - Select to take you through to the Stitch Out screen.
- To ensure the second design stitches in the correct position, go to Basic Design Positioning.
- Select Step 1. A red cursor will appear on the screen.
- Touch the screen with the stylus and drag it to line up with top left corner mark on the screen.

- To ensure accuracy select the button on the bottom right hand side of the screen.
- Select the Zoom icon.
- A new set of icons will appear on the right hand side of the screen.
- To zoom in on the cursor select Zoom to Cursor.
- The screen will now display a close up of the cursor and corner marking. If your red cursor is not exactly where it needs to be then select the icon again.
- Press Design Placement Options and move the red cursor into position.
- Now select Step 2. This will move the locked point on the fabric.
At this point, you are watching where the needle is positioned on the fabric NOT the screen of the machine. - Place the stylus on the screen of the machine and move until the needle is lined up with the bottom left corner alignment stitch from the previous design. Keep the needle in the upright position while moving. Once close to the correct position wind the fly wheel down to lower the needle and check you are in the correct position. Once in position, lift the needle into the upright position.
- To move the screen out of the zoomed in position, go to the icon and select the Zoom icon.
- Once in place select the to accept and return to the Stitch Out Screen.
- Stitch out the nose and remaining eye and whiskers. You do not need to stitch out the alignment stitches as these are no longer needed.
- Once the design is finished, press the to say the embroidery is finished.
- Remove the hoop from the embroidery arm and select Return to Embroidery Edit.
- Unpick the alignment stitches.
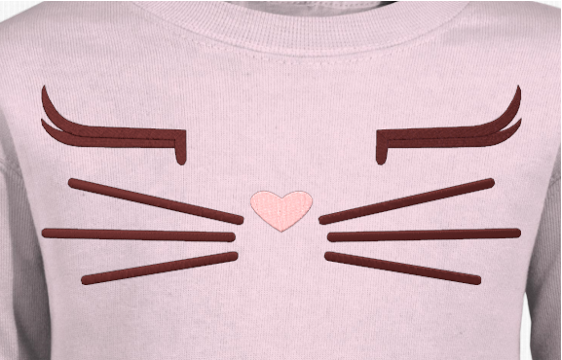
- Your design is now ready to go!
Bag Construction:
Seam allowance is 1cm, unless otherwise indicated.
- Set your sewing machine for straight stitch and medium stitch length.
- Thread the needle and bobbin with all-purpose thread.
- Using the Vliseofix manufacturer’s instructions attach the inner pieces to your outer earpieces.
- Place a piece of tear-A-way behind the ear. Using a decorative stitch, go around the inner piece, covering the raw edge.
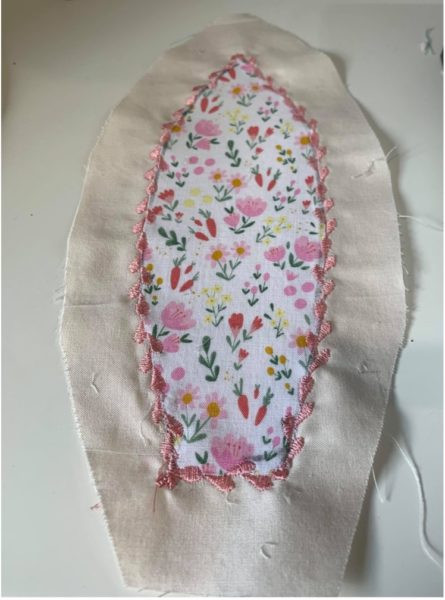
- Pin your earpieces right sides together and sew. Leave the bottom open for turning out. Press.

- Fold each handle strip in half lengthwise. Stitch 6mm along the edge of each strip. Press seam open and with seam centered on back side of handle.
- Turn each handle right side out.
- Edge stitch 3mm from each folded edge of each strip.
- Right sides together and raw edges matching, machine baste ends of the handle to the top edge of tote front and back and ears to the front as shown:
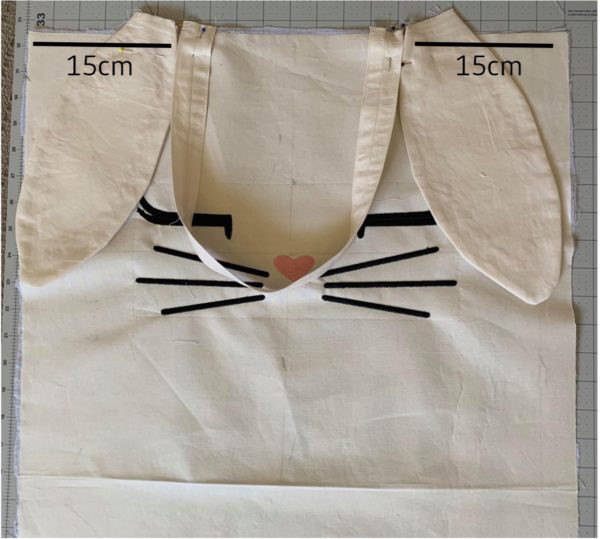
- Trim The ear ends closer to top of the bag.
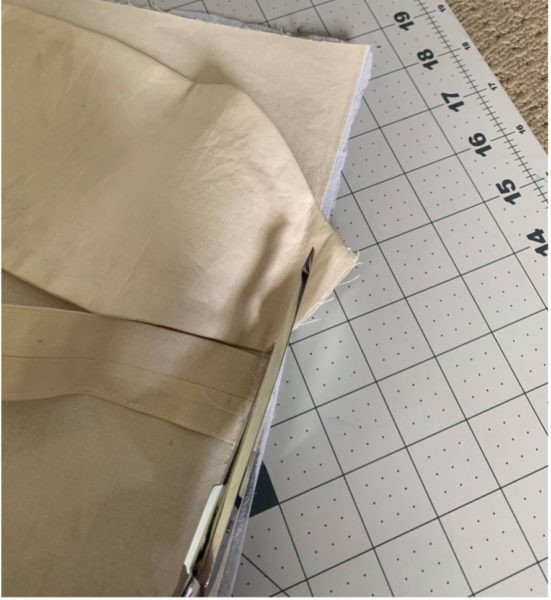
- Fold bag in half, right sides together, so it measures 51cm x 41cm. Sew each side seams from top edge to fold. Press seams open.
- To box corners, fold so the side seam matches the crease at the bottom of the bag. Mark 2” from point. Draw a line across fabric from fold to fold.
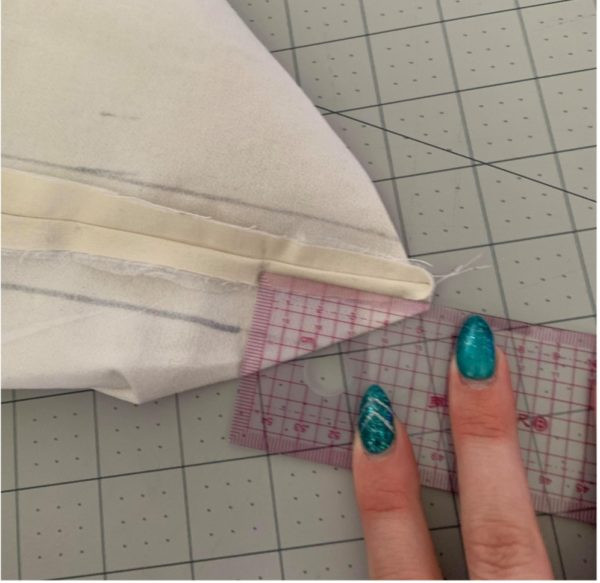
- Stitch along line. Repeat for other side.
- Turn bag right side out.
- Fold lining in half, right sides together, so it measures 51cm x 41cm. Sew one side seam from top edge to fold. Sew other side seam leaving a 15cm opening in the seam (for turning to the right side after lining is sewn to the bag). Press seams open.
- Box corners for lining, repeat steps 9-13. Trim excess points for lining.
- Slide bag into lining, right sides together, matching the seams and top raw edges. Pin.
- Sew the lining down into the bag. Press along top edge.
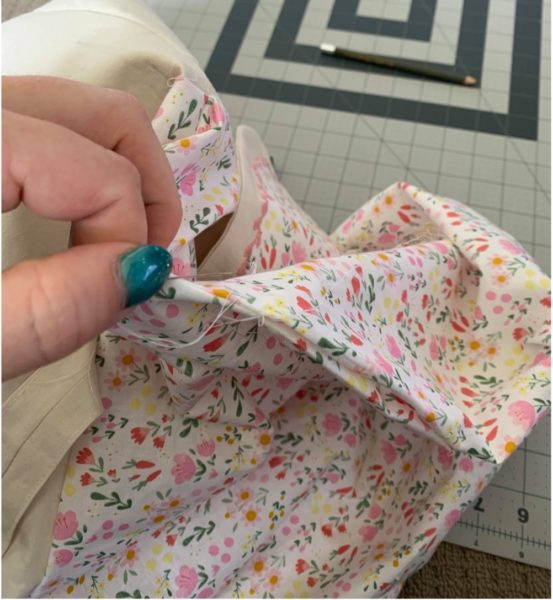
- Edge stitch 3mm from the top edge of the bag, keeping handles and bunny ears free from the stitching area.
- Fold the fabric for the cardboard cover in half so it measures 11cm x 38cm. Sew along the edges of each side. Turn right side out. Press.
- Slide cardboard into the open end of the cover. Tuck in raw ends and hand sew the opening closed.
- Place the covered cardboard base inside bag for added stability. Remove cardboard base when cleaning or laundering the bag.
