Sewing
Knits
Knits consist of vertical rows of loops that are called ribs or wales. More ribs per inch will mean a more rigid and stable material, fewer ribs will mean stretchier material. When sewing with knits always use a ball point needle and pins. Resist the urge to pull the fabric while sewing as this will stretch the material, but do try to support the weight. An even feed foot or a walking foot will provide the best results. Always use a scrap piece to find the best settings, but you will most likely use a lower tension than normal.Jersey
Jersey knit fabric has flat visible vertical lines on the front and horizontal ribs are dominant on the back. Best for T-ShirtsRibbing
Rib Stitch knits have columns of ribs on both the front and back of the fabric and provide excellent elasticity. Best for Cuffs and necklines.Interlock
Interlock knits have the same pattern on both the front and back of the fabric. The interlocking prevents the fabric from producing runs and it doesn’t curl at the edges. Best for Dresses and apparels.Double knit
Made using an interlock stitch, but with a rib-like appearance. Generally quite firm and less stretchy.
Integrated Even Feed or IEF “walks” over the fabric to assist with keeping fabric layers feeding at the same rate. With the IEF, fabric can be sewn without shifting or puckering since the fabric is gripped and fed by both upper and lower feed teeth. It feeds well with materials such as plaids, knit, vinyl or leather. It is also often used in quilting when sewing two layers of fabric and one of batting.
This is a feature that is unique to the New Featherweight C240.
Most portable sewing machines (a machine not attached to a table) have a free arm. The free arm is often used when sewing pant legs, cuffs and sleeves. The free arm is located at the bottom of the sewing machine protruding out from the main body and slightly in front of the needle and feed dogs. Usually, the accessory compartment slides off to reveal the free-arm.
The take-up lever is not visible to the eye; it is hidden behind the front panel of your machine.
Make sure the needle is at the highest position, slip the thread into the opening between the front cover at the top of the machine, pull the thread down behind the lever and then pull it towards you, the take-up lever will then thread itself. The take-up lever has an opening at the back that allows the thread to slip into it from behind.
Household sewing machines are designed to be used with regular all-purpose sewing thread. This thread can be purchased from your local sewing or fabric store. Most all-purpose thread is 100% polyester. If you are quilting, you can use cotton thread.
You can occasionally use a heavy duty thread or buttonhole twist. However, using this type of thread constantly will eventually damage your machine’s tension. If you do use heavy thread, be sure to use a appropriately sized needle (size 16 or 18) and increase the stitch length.
We recommend Singer oil only in our machines
Good question! If your machine manual does not include instructions on oiling, your machine has been pre-lubricated at the factory and will not need additional lubricating. However, you can put 2 to 3 small drops of sewing machine oil in the bobbin case area and on the needle bar as this will not harm the machine. You may also put a few drops on the handwheel where it meets the side of the machine. If your manual does call for you to oil the machine, and you use your machine every day, we suggest that you lubricate once a week. If you use your machine once a week, lubricate once a month. If you only use your sewing machine once a month, lubricate once every three months. We also recommend that you have your machine tuned-up by a qualified Singer® technician every 3 to 4 years to keep it in good running order. PRO TIP: If the machine has not been used for several years, we recommend a tune-up, just like you would do if you had not used your car for a long period of time. Lack of activity or movement will cause the lubricant to dry out and using the machine at that time can cause parts to break.
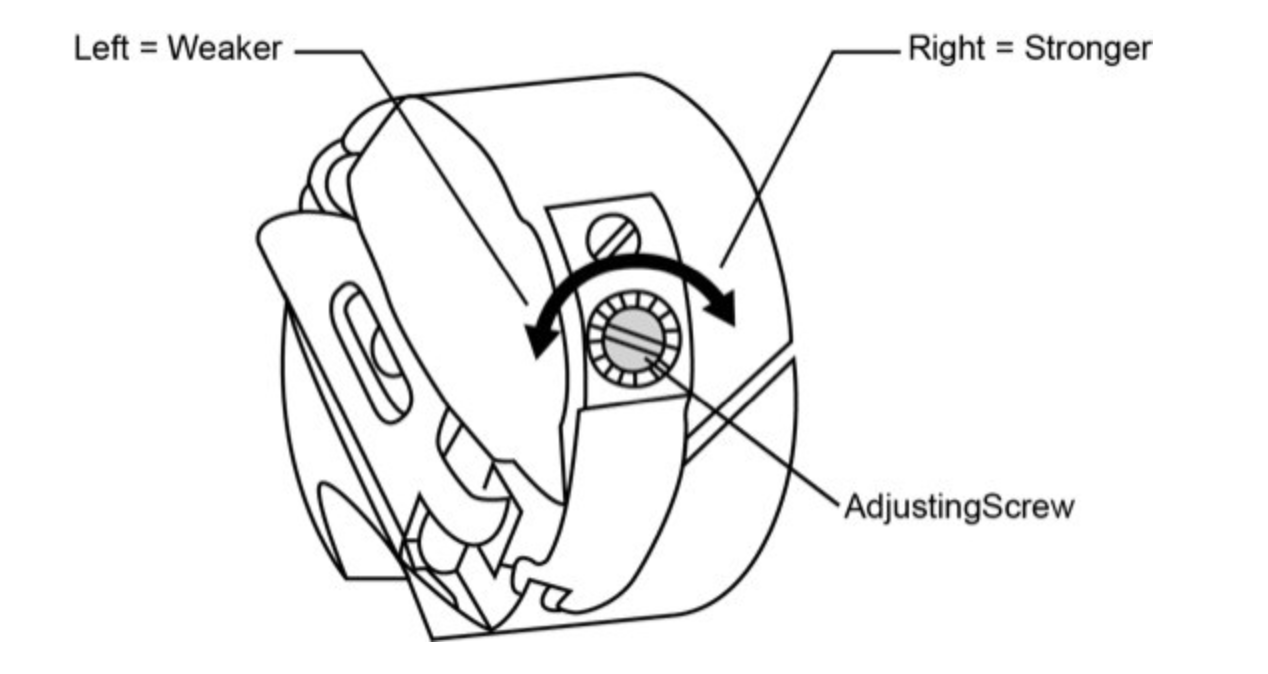
Thread looping on top of your fabric signifies that your bobbin is not inserted or threaded correctly.
PRO TIP: The bobbin tension is pre-set at the factory and usually never needs adjusting. However, if the bobbin is threaded properly and the problem still persists, remove the bobbin case and adjust the screw on the side of the bobbin in small increments. Adjust as needed until loops disappear.
For Top Drop-in Bobbins
For Full instructions on how to properly insert your top loading bobbin please watch these videos on Top Drop In Bobbins:
Drop & Sew™ Bobbin System
Drop in Bobbin System
Are you using a Singer® brand needle? Are you using the bobbins that came with your machine?
Thread looping under your fabric is usually caused by not threading the upper tension correctly. With the presser foot lever in the Up position and tension set at 4, follow the threading guides/graphics on the top of the machine.
1. Place the thread spool on the spool pin and secure with a thread spool cap.
2. While holding the thread with your right hand, use your left hand to take the thread down into the tension channel around the bottom and up the other side. As the thread comes up the opposite channel, and reaches the top, you will need to slip the thread from back to front into the take up lever. Continue to thread the machine, but do not thread the needle.
PRO TIP: Before threading the needle, perform this easy test to make sure the upper thread is threaded correctly. Making sure the presser foot is raised, pull the thread. It should pull easily. Now lower the presser foot, the thread should now resist when you pull it. There should be a significant increase in the tension of the thread. If there is no increased tension, the machine is not threaded correctly.
Skipped stitches can mean one of two things: needle issues or disrupted timing.
First, your needle may be dull or damaged and needs to be replaced. You should also check that you are using the correct needle for the type of fabric you are sewing. For example, knit and synthetic fabric requires a ballpoint Singer® needle (style 2045). Next, check the needle is inserted correctly. The needle needs to be pushed as far up the needle shaft as possible. (It’s easy to insert the needle half way, clamp it down and think it is inserted correctly.) Also, the flat part of the needle should be positioned towards the back. If the needle is not inserted correctly, it will not be able to pull up the bobbin thread and will cause skipped stitches.
If the troubleshooting tips above did not correct the problem, please take your machine into a Singer® service center. It is possible the timing on the machine has been disrupted and needs to be reset.
We get this question a lot. Don’t worry…easy fixes provided below!
First, make sure the bobbin-winding spindle (located on top of your machine) has been pushed back to the left for sewing. If it is not in the correct position, the needle will not go down and pick-up your bobbin thread.
Next, make sure your needle is inserted correctly, as far as it will go, with the flat side facing back. Also, make sure your bobbin is in correctly (not backwards) and that the upper tension disks of your machine are threaded correctly. Make sure the presser foot is up when seating the thread through the upper tension. Now, it’s time to draw up your bobbin thread.
Turn the handwheel (TOWARDS YOU ONLY, never turn the handwheel away from you) and hold the needle thread lightly. Tug on it as the needle goes down and then comes up again. You should see a small loop come up through the needle plate (this is your bobbin thread), using the tip of a narrow object like a pencil or scissors, pull the loop up and then pull both threads (top and bobbin) under the foot and toward the back of the machine.
If the above troubleshooting tips did not solve your issues, you may need to have your machine repaired for timing. If the timing is out, the needle thread is not meeting the bobbin thread in time to form a stitch.
First, your needle may be dull or damaged and needs to be replaced. You should also check that you are using the correct needle for the type of fabric you are sewing. For example, knit and synthetic fabric requires a ballpoint Singer® needle (style 2045). Next, check the needle is inserted correctly. The needle needs to be pushed as far up the needle shaft as possible. (It’s easy to insert the needle half way, clamp it down and think it is inserted correctly.) Also, the flat part of the needle should be positioned towards the back. If the needle is not inserted correctly, it will not be able to pull up the bobbin thread and will cause skipped stitches.
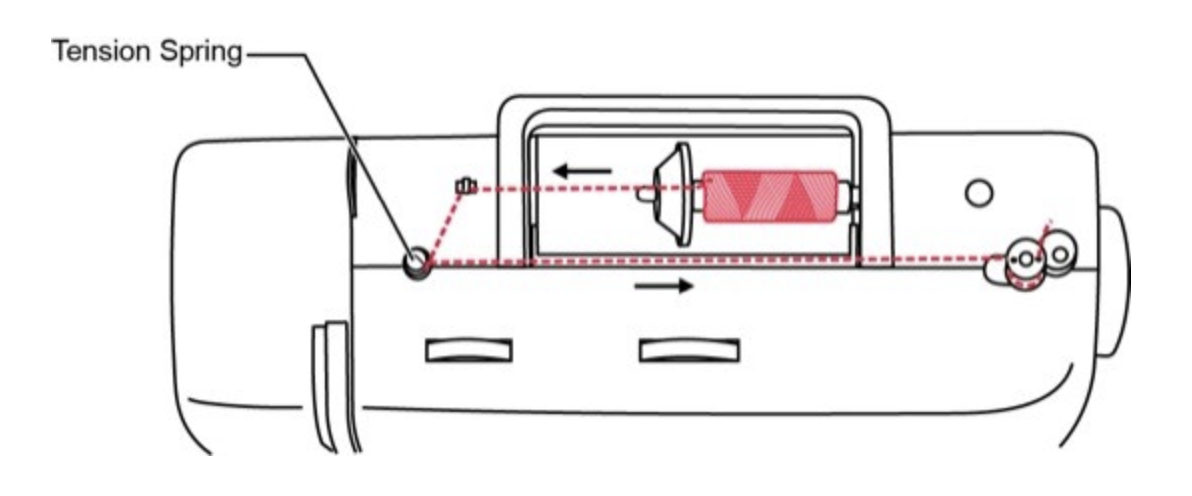
If your bobbin is winding unevenly, it’s possible you have not placed the thread correctly around the bobbin winding tension spring. If you believe the thread is placed correctly, please try wrapping the thread around the tension spring a second time – a common practice among avid sewers.
If none of the troubleshooting techniques above solved the issue, please contact us to organise a service on your machine.
To sew denim, we recommend that you use a Singer® denim style 2026 needle. Using another brand of needle can cause tension issues. You will need to set the machine for a straight stitch with the length regulated between 4 and 5 to allow the thread to wrap around the extra thickness of fabric. You will also get better results if you use the metal all-purpose foot that was originally attached to the shank when you took the machine out of the box. If you want to use topstitching thread, use it in the upper tension only; use regular all-purpose thread in the bobbin.
To sew other heavy fabrics, we recommend that you use a size 16 or 18 Singer® brand needle. You will need to set the machine for a straight stitch with length regulated between 3 and 4. You will also get better results if you use the metal all-purpose foot that was originally attached to the shank when you took the machine out of the box.
Sew at controlled moderate speed when sewing over multiple layers of seams.
You may have accidentally lowered the buttonhole lever located just to the left of the needle bar. To make sure it is in the correct position for sewing, place your finger under the lever and push up. Also make sure the needle is set at the highest position and the bobbin winding spindle has been pushed back to the left.
NOTE: To set the needle at the highest position, turn the hand wheel TOWARDS you, until the needle moves to the highest position.
Finally, push the reverse button a couple of times, this will reset the machine. If none of the troubleshooting techniquest above solved the issue, please contact us to have your machine serviced.
Overlocking
Differential feed is a feature available on many models of overlockers, which prevents puckered or stretched seams and it is used to gather fabrics.
Information sourced from The New Sewing with a Serger from the Singer Reference Library
Overlockers also known as Sergers offer the special stitches of ready-to-wear with faster and easier construction methods.
These machines can sew seams up to 1300 stitches per minute, and trimming and overcasting the raw edges at the same time for quality seam finishes. When used in conjunction with a conventional sewing machine, an overlocker can add new excitement to your home sewing.
Fabrics that you previously avoided can be sewn effortlessly with an overlocker. Overlockers are excellent for stitching seams with built-in stretch for T-shirts and swimwear made from knit fabric. They also excel at sewing all types of woven fabrics, from sheer and silk to heavy denim.
In addition to the basic stitches for seams and seam finishes, alternative hem stitches are also available to add special details to your sewing projects.
Overedge seam finishes. Add the look of ready-to-wear to unlined garments
Pucker free seams on silk fabrics are fast and easy to sew on an overlocker.
Flatlock stitching with decorative thread is used for a special effect.
Rolled hems are narrow, neat edge finishes for ruffles and hems.
Overlocked seams are stitched as selvages are trimmed away. Differential feed makes gathers easy.
Sweater Knit Fabrics and ribbings are sewn without fear of the fabric unraveling.
Ovelock stitches that stretch are perfect for sewing swimwear from two-way stretch fabric.
Information sourced from The New Sewing with a Serger from the Singer Reference Library